skip to main |
skip to sidebar
WARNING: This mod may degrade SD card life.
What you need:
- MiniTool Partition Wizard for SD Card Partitioning
- A MicroSD HC 4GB or higher class 6 or class 10
- MicroSD HC Card Adapter
- A card reader (if your pc doesn't have card reader built in | USB Mount is not adviseable)
- Swapper2 from Google Play Store [DOWNLOAD]
- ADB Shell or terminal Emulator (to check if swap is activated)
- Make sure you have BusyBox installed
Before we start, lets do some reading . . .
RAM
What is RAM
Random Access Memory (RAM) is temporary data storage that the CPU uses during calculations. The more RAM a device has, the more calculated results the CPU can store - which means less time the CPU has to do the same thing over and over again. In other words, the CPU can check RAM to see if it has already made a particular calculation in the recent past. If it has, it can use the pre-computed results instead of wasting processing time recomputing the same calculation. In short, more RAM means a more efficient (and faster) device.
SWAP
What is SWAP
Swap is, in short, virtual RAM. With swap, a small portion of the hard drive is set aside and used like RAM. The computer will attempt to keep as much information as possible in RAM until the RAM is full. At that point, the computer will begin moving inactive blocks of memory (called pages) to the hard disk, freeing up RAM for active processes. If one of the pages on the hard disk needs to be accessed again, it will be moved back into RAM, and a different inactive page in RAM will be moved onto the hard disk ('swapped'). The trade off is disks and SD cards are considerably slower than physical RAM, so when something needs to be swapped, there is a noticeable performance hit.
Unlike traditional swap, Android's Memory Manager kills inactive processes to free up memory. Android signals to the process, then the process will usually write out a small bit of specific information about its state (for example, Google Maps may write out the map view coordinates; Browser might write the URL of the page being viewed) and then the process exits. When you next access that application, it is restarted: the application is loaded from storage, and retrieves the state information that it saved when it last closed. In some applications, this makes it seem as if the application never closed at all. This is not much different from traditional swap, except that Android apps are specially programed to write out very specific information, making Android's Memory Manager more efficient that swap.
Step by Step Guide
How to create Swap Partition
Using MiniTool Partition Wizard
- Plug in you MicroSD HC Card to your computer using the card adapter. (Do not use USB Mount)
- Open MiniTool Partition Wizard and look for the card
- Right Click on it and select Delete Partition
- Click on Apply to Delete the Partition
- Right Click on it again and select Create Partition
Set the partitions as follows:
1st partition:
Label: Android-SD
Create as: Primary
File System: Fat32
Partition size: as much as you want!
2nd partition:
Label: Android-EXT3 (2nd partition is for EXT which you can use for A2SD or Link2SD)
Create as: Primary
File System: EXT3 (be it a custom kernel or ROM with EXT4 support, use EXT3 still -play safe!  )
)
Partition size: MIN: 256 MB MAX: 1024MB (1GB)
3rd partition:
Label: (do not put anything)
Create as: Primary
File System: Linux Swap
Partition size: MIN: 32MB MAX: 1024MB(1GB) RECOMMENDED: 256MB
- After creating partitions, click Apply to apply changes.
Using ClockWorkMod
- Reboot to Recovery
- Go to Advanced and Debugging
- Select partition SD card and select the partition size that delights you
How to use Swap
For us to be able to use swap file or swap partition, we need to use Swapper2 which you can get from Google Play.
- Download and Install Swapper2 (of course)
- After installing, open Swapper2 and navigate to Menu > Settings
Swapper preferences: (for kernels that doesn't have swap partition support)
- Run swapper at startup (put a check)
- Swap place: /sd card/swapfile.swp (you can place it in a folder if you don't like a messy sd card structure
 )
)
- Swap size: MIN: 10 MB MAX: 256MB RECOMMENDED: 32MB (choose any)
- Swapiness: RECOMMENDED: 10MB SYSTEM DEFAULT: 60MB MAX: 100MB (choose any)
- Safe unmount (put a check)
- Safe remount (put a check)
Advanced preferences: (for Kernels that supports swap partition only)
Use swap partition (put a check)
Swap partition: /dev/block/mmcblk0p2
- After setting preferences, press back and tap on "ON" to turn on swap. Reboot afterwards
How can I tell if swap is running?
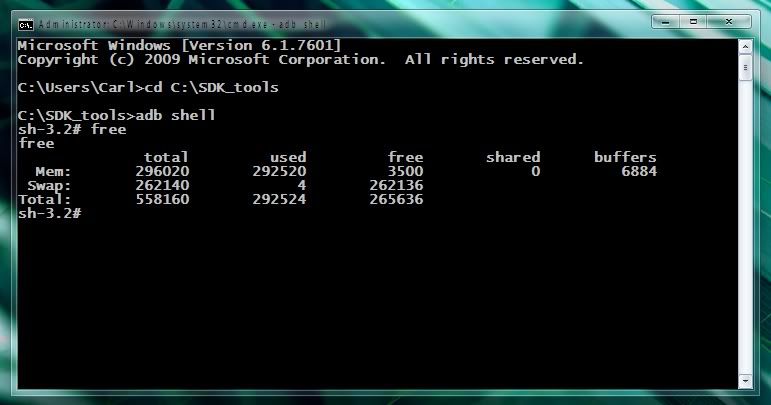
Go to the terminal emulator - or open adb shell - and run 'free'.
If it looks like this (with zeros in the swap line), you do not have swap:

If it looks like this (with anything other than zeros in the swap line), you do have swap:
NOTE:
You need to turn off swap before you mount SD via USB, if you don't you will not be able to mount sd as swapfile is active and set to read only which will deny request to mount USB Storage.
ALL THANKS TO
CarlDeanCatabay for this great guide.
this is only one of dualboot implementation based on irfanbagus's work. in this mod the second ROM will installed on sdcard with modified partition size. we'll make bigger partition on data and system partition.

requirement:
1. know how to customize a rom.
2. know how to install a custom kernel
3. know how to partition sdcard, and of course
3. a sdcard minimal 8gb class 6.
what you'll nedd:
1. a custom rom to be modified.
2. a dualboot custom kernel. you can get it here. http://www.mediafire.com/?6zrkh6a872036x7
3. a modified rom installer script. http://www.mediafire.com/download.php?nxgiz0993brp9re
4. a partition tools.
5. all things needed to modify a rom.
the steps:
1. >>>SDCARD PARTITION<<<
make 4 partition on your sdcard. all partition is primary. my recommended setting for all partition is. 6gb fat32 on first partition, 300mb ext3 on 2nd partition, 300mb ext3 for 3rd partition, and the rest ext3 for 4th partition. you can modify the the 1st and 4th size but don't change the 2nd and 3rd partition size.
2. >>>install irfan's dualboot kernel<<<
feel free to use any method to install the kernel. you can use mai77's, faqbly's method or odin to install the kernel.
3. >>>ROM preparation<<<
extract your custom rom. replace meta-inf folder with the one I've give to you. this script will install your rom to your sdcard partition. re-zip the rom, then copy it to your formatted sdcard (in the 1st partition of course). if these script didn't work check irfan's original post for detailed guide on modifying installer script here http://forum.xda-developers.com/show....php?t=1598803
4. >>>dual boot setting and ROM installation<<<
create a blank file in sdcard named 'bootsdcard' then go to recovery mode. install your custom rom. wait till it finished then reboot. the first installation will take a longer than the usual. be patient.
finish. enjoy your 2nd rom with larger /data and /system partition
========
there are several possibilities on installing the new rom. in most cases, it have succesfully installed the rom (I've got no report on installation failure till this moment). but if the rom doesn't work, you'll need to modify the rom and the installer script.
DISCLAIMER:
1. DO IT WITH YOUR OWN RISK.
2. the succession rate is depend on your custom rom and your sdcard quality. do your best to modify it.3. don't use a2sd or link2sd4. don't install the app on sdcard when you use the 2nd rom.5. it will get laggy if your sdcard is not fast enough. you'll need a faster one.6. this mood will make your battery drains faster. please be cautious.credits:1. myss ROM developer. my installation script is based on it.2. irfanbagus, for the dualboot kernel and his helpfull guide.3. all XDA member who have share their knowledge for us.I'm a chemis student. another mid-user here. no need to give thanks. give them to the dev instead.UPDATE:http://www.mediafire.com/download.php?hw9jgrui1ga4akgthis is another updater script which automatically delete your sdcard's /data partition.
An independent developer has released a version of VLC media player for Android device. This is not the official release of VLC and is no way related to the VLC developers. As VLC is an open source project independent developers are allowed to make changes to the software in order to make use of that.
This is just an alpha release of the software. "There are two builds available of VLC for Android, known as NEON and NONEON. The difference is in the processor type. Because VLC for Android makes use of the NDK (Native Development Kit), it is compiling native-level binaries that will only work on the processor class for which they were designed. This means that the same build will not work across all devices," the developer advices through his website.
Download HereNeon version: dl.cvpcs.orgNon neon Version: dl.cvpcs.org
A new product released by SCOTT HERBERT for Android mobile phones,Its AnDOSid - the DOS tool for Android Phones. The rise of groups like Anonymous and LuzSec, as well as constant India / Pakistan cyberwar has raised the issue of cyber-security high(er) in the minds of web owners.
Pentesting tools exist to simulate such attacks and help website security people defend against them, however for the most part they currently only exist for desktop computers. Mobile phones have, over the last few years, grown from simple devices that send and receive calls to mobile computing platforms which can be purchased for less than $100 a device.
AnDOSid fills that gap, allowing security professionals to simulate a DOS attack (An http post flood attack to be exact) and of course a dDOS on a web server, from mobile phones. AnDOSid is actively being developed and I welcome feedback from the security community as to how you would like the application to evolve.
Features:Requires Internet access to send the http post dataRequires phone state to access the IMEI (one of the two identifiers sent with each post)
Download here:


.jpg)


